Tuesday, November 1, 2011

Polenta Pancakes

I could go on and on about polenta pancakes. The slight crunch of golden toasted cornmeal on the outside. The creamy sweetness of yellow polenta on the inside. The all-consuming desire to track them down at a local breakfast place. The slightly deranged look on my face when I announced, after getting home from a disheartening encounter with an inexcusably dry and mealy "corn pancake" at a restaurant whose name I have blocked out of my memory due to the trauma of unmet expectations, that FINE then, fine, you know what? We'll just learn how to make them ourselves. What do you say to THAT? (The restaurant, by now severely out of earshot, did not in fact reply. But we showed it. Oh yes.)


Admittedly, our first attempt was dry and mealy. So I can commiserate, I suppose, with the forgotten restaurant's corn-based difficulties (but seriously, shouldn't they have tried more than once before putting it on their menu?). Our second attempt, adapted from this recipe in the New York Times, yielded a true polenta pancake in all its glorious perfection.


Ingredients
1 cup coarse-ground corn meal
1/2 tsp kosher salt
1 1/3 cups boiling water
1/2 tbsp chickpea flour
1 1/2 tbsp whole wheat flour (plus extra if needed)
Olive oil (yes, extra virgin as always)
1/4 cup pine nuts, lightly toasted
a scant 1/2 tsp vanilla extract


Mix the cornmeal and salt in a medium bowl and add the boiling water. Whisk immediately to combine and let sit for 10 minutes to allow the cornmeal to soften and absorb most of the water. Stir in the flours halfway through.

Slowly stir in the milk with a wooden spoon until the batter is "spreadable but still thick," as it says in the original recipe. (You can add another 1/2 tbsp whole wheat flour if needed to keep it from getting too thin.) Stir in 2 tbsp olive oil, the vanilla, and the toasted pine nuts.

Heat a nonstick skillet or frying pan over medium heat. When very hot, brush quickly with olive oil (you want a thin layer along the bottom) and then pour in the batter in 1/4 or 1/3 cup scoops. The scoops should spread out slowly in the pan -- if they don't spread, add a tbsp more milk to the remaining batter, and if they spread out quickly and get too thin, add a little more flour.

Cook for 2-3 minutes until the edges look dry and the bottoms have turned a lovely medium golden brown. Flip carefully, and cook another couple minutes until both sides are golden. Keep the pancakes warm as you cook the next batch (either on a plate on the stove under foil or in the oven). Try not to stack the pancakes too high on the plate, since they'll start to stick together.

Serve with a little butter and maple syrup, or raspberry jam, or blackberries, or whatever else strikes your fancy over the top.


Serves 2-3.

Saturday, October 29, 2011

Bread and Butter and a Watermelon Radish

Speaking of simple yet addictive, try this one, suggested by our CSA box insert long ago and resurrected after my mom gave us a watermelon radish.


A watermelon radish, in case you don't know, is what Gandalf would be if Tolkien wrote salads instead of books (and you've already met Sauron). Putting radishes and butter on bread is apparently a French thing, and at first glance not related to Tolkein in any way, until you have it as a 10am second breakfast one morning and realize you're going to need to introduce third breakfast as an excuse to eat another before lunch.

Ingredients
Freshly baked bread, sliced
Pasture butter (or a good quality, salted, European-style butter)
Radishes, thinly sliced

Lightly butter the slices of bread, and cover with a single layer of radish.

Seriously, that's it. The crunchy bite of the radish brings out the creamy sweetness of the butter and makes this a perfect mid-morning snack. Or mid-afternoon snack. Or post-dinner pre-dessert snack. Whichever.

Thursday, October 27, 2011

Pan-Fried Zucchini

I know what you're thinking. Off she goes for a whole week, and all she comes back with is zucchini slices? But before you judge, consider this: Happiness is three mostly-plant ingredients, a pan, and a recipe that will take less than ten minutes. For those nights when you want french fries rather than vegetables. (Until you make this and decide what you really wanted was pan-fried zucchini. You just didn't know it yet.)

Ingredients
Zucchini or other green summer squash, sliced into circles*
(go for 1/8 to 1/4" thick. The thinner the slices, the faster they cook.)
Olive oil
Kosher salt

Heat a nonstick pan over medium heat. When hot, drizzle the bottom lightly with olive oil. Add the zucchini slices in a single layer (a little bit of overlap is fine, but use a wide enough pan that you don't have to double the layer, since they'll release some moisture and too much liquid will prevent them from browning).

Pan-fry until golden brown on the bottom, then flip the slices and brown the other sides. If your slices are on the thicker side, you can cover the pan after a few minutes to steam them a bit and help them cook through (unlike most other vegetables, I tend to like zucchini better the softer and more cooked it gets). Uncover the pan again if you start to see a pool of liquid building up, and let it evaporate before recovering.

When the slices are well-browned and soft, turn off the heat. Sprinkle with salt and serve hot.


*If your name is Luke, please ignore the recipe from this point on. Instead, sprinkle with heat and serve.

Thursday, October 20, 2011

Ode to the Curry Leaf

It's hard to be sure, of course, in the absence of rigorous scientific experimentation, but I am nevertheless 60-82% certain that the majority of the world's problems could be solved by the curry leaf. For example, wars. Given the choice between going to war and eating a perfectly cooked mustard seed crusted salmon filet wrapped in curry leaves, most people would obviously devour the latter, at least if you set it down in front of them and they could smell the rich scent of toasted curry leaves wafting from their plate.

Also lots of other problems. I don't have time to go into them now. Too busy plotting our next excursion to acquire more curry leaves.

So here is my advice to you: Buy them. Borrow them. Don't necessarily steal them from old ladies because I can't bring myself to publicly condone that sort of behavior (although obviously if an old lady had ALL the curry leaves in the area and utterly refused to give you any when you gently encouraged her to share by pulling as hard as you could on the bagful that she was carrying, an extra-hard tug might be justifiable). If you're in Berkeley, Vik's has them (as well as most or all of the ingredients for the dal below); in NYC, go to the little store underneath Sigiri (after stuffing yourself at Sigiri, of course) and look in the refrigerator case.


Anywhere else, look for an Indian spice store somewhere and ask them if they know where you might find some in the area. (If you've had curry leaves before, note that it is understandable yet nonetheless considered poor form to grab people urgently by the collar as you do this.) The leaves will keep well in the freezer without losing much taste for up to a month or so. And they're DIVINE. Have I mentioned that? Divine.


What to do with your curry leaves, once you acquire them? Heat some olive oil in a pan, add several fresh curry leaves and saute for a couple minutes, then add other things. Cook and eat. Repeat as needed. Or make this (I'm sorry, that conjunction was entirely incorrect. Allow me to rephrase: AND make this).

Sri Lankan Dal Curry over Yellow Basmati Rice
I have no idea where we found the original recipe that gave rise to this dish (so let me just go ahead and thank anyone on the planet who knows how to cook Sri Lankan dal, for making the world a much better place), but we've adapted it over the last few years to come as close as possible to the lentil curry at the incomparable Sigiri in New York. It looks much more complicated than it is, because of all the spices, but it's actually a very straightforward recipe once you have the ingredients on hand.


Dal Ingredients
Olive oil
1 medium yellow onion, chopped
2 large cloves garlic, pressed
1 tsp black mustard seeds
1/4 tsp yellow mustard seeds
2 stemfuls of curry leaves, washed and dried (when in doubt, err on the side of more rather than less)
1 tsp Aleppo pepper (or 3/4 tsp if you want to keep it mild; can sub a minced hot pepper)
1 1/2 cups toor dal (small yellow lentils), picked through carefully, rinsed, and drained
1 cinnamon stick
1 tsp turmeric
1/4 tsp ground fenugreek
3 cardamom pods, cracked
2 cloves, lightly crushed
1 can coconut milk, divided (reserve 1/3 cup for the end)
Salt

Rice Ingredients
Olive oil
1 tbsp sliced almonds
2 tbsp golden raisins
4 curry leaves (optional)
2 generous pinches saffron
1 1/2 cups white basmati rice


Heat a generous glug of olive oil in a medium-to-large pot. Add the onion and saute over medium heat until soft, then add the garlic. Saute for a minute more, then add the mustard seeds, curry leaves, and Aleppo pepper. Saute for another minute or two, stirring occasionally.

Add the dal, cinnamon stick, turmeric, fenugreek, cardamom, cloves, most of the coconut milk (reserving 1/3 cup), and 2 cups of water. Stir, cover, and bring to a simmer. Turn the heat down to low and simmer rapidly until the dal is tender (about 20-25 minutes), stirring every 10 minutes or so. You may want to leave the lid ajar for the last ten minutes or so if it seems very soupy (or leave well-covered if it seems to be drying out).


Meanwhile, heat a teaspoon or so of olive oil in a small pot over medium heat. Add the curry leaves and almonds and saute for a couple of minutes until they just start to turn fragrant (but before the almonds have really started to brown). Add the saffron and golden raisins and stir a few times, then add the rice and stir to coat evenly. Pour in just over 1 3/4 cups water, cover, and bring to a boil. Turn the heat down to low and simmer for 15 minutes or until the rice is cooked through (the ratio of water to rice is going to change slightly depending on your rice and stove and pot, so check a few minutes before it should be done and add a tablespoon more water if necessary, or leave the lid ajar to boil off excess liquid).


When the lentils are tender and soft, turn off the heat, stir in the last 1/3 cup of coconut milk, and season to taste with salt. Remove the cinnamon stick, cardamom pods, and cloves (as far as we can tell, it is only possible to find three out of four of the smaller whole spices at a time. If you're worried that your dining companions will stare at you accusingly if they happen upon a particularly pungent bite, tell them that whoever finds the last one "wins." Kind of like a King Cake, only with a cardamom pod where the plastic baby should be.)

Serve the lentils over the rice, with a side of sauteed greens.

Serves 3-4.

Thursday, October 13, 2011

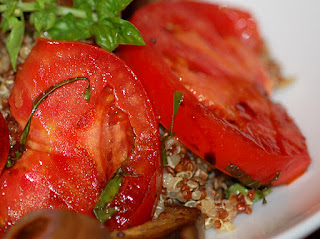
Eggplant and Tomato with Fried Basil and Quinoa

Once upon a time, in a land not so far away from our stove, fried basil met a balsamic reduction. It was, of course, love at first sight, but their affair began in difficult times: In the absence of grocery shopping, the protein choices had dwindled to quinoa or lentils. Eggplants and tomatoes from the produce box shifted anxiously on the counter, unsure of how to play together. A lone garlic clove stood watch in the fridge, while two tired and hungry cooks waited impatiently for inspiration, or a lost and unsuspecting pizza delivery guy. Whichever came first.


Then we made this. It had no right to be either delicious or filling, but it was both, and we'd make it again in a heartbeat.

Ingredients
1 cup mixed red and white quinoa (you'll have a bit extra for leftovers)
1 1/4 cups vegetable broth
1 clove garlic, smashed
2 small japanese eggplants, halved lengthwise and cut into 1/2 inch slices
2 tbsp veggie broth
Black mustard seeds
20 leaves fresh sweet basil, chiffonade
1 medium heirloom tomato, thickly sliced
3 tbsp balsamic vinegar
Salt and freshly ground black pepper

Rinse the quinoa and then let soak in cold water for 15-20 minutes. Drain well.

Combine the quinoa and broth in a small pot, bring to a boil, and turn down the heat to low. Simmer for 20 minutes or until the liquid is absorbed.

Heat the balsamic vinegar in a small pot over medium heat until it simmers, then turn down the heat and simmer gently until the volume is reduce by half. Set aside.

Meanwhile, heat a nonstick frying pan over medium heat. Add a generous glug of olive oil and the smashed garlic clove, and let it cook for a minute to flavor the oil. Add the eggplant and toss to coat lightly with oil. Sprinkle in a light scattering of mustard seeds and a pinch or two of salt. Cook, stirring occasionally, until the eggplant begins to brown.

Add the veggie broth and cover the pan, turning down the heat to medium-low. Let steam for 2-4 minutes. The eggplant should have mostly cooked through. Uncover, let any remaining liquid evaporate, and push the eggplant to one side of the pan. In the other side, heat about a teaspoon of olive oil (turn the heat back up to medium), and then toss in two-thirds of the basil. Fry for about a minute, then stir to combine with the eggplant. Add the tomato slices, gently stir a couple of times, sprinkle with salt, and turn off the heat.

Mix about two-thirds of the quinoa with a little olive oil, a teaspoon of balsamic reduction, a pinch of salt, and some freshly ground black pepper in a bowl. Divide into dishes. Serve the eggplant-tomato mixture on top, and drizzle with balsamic reduction before serving.


Serves 2, and pairs well with (I can't believe I'm saying this) roasted beets.

Monday, October 10, 2011

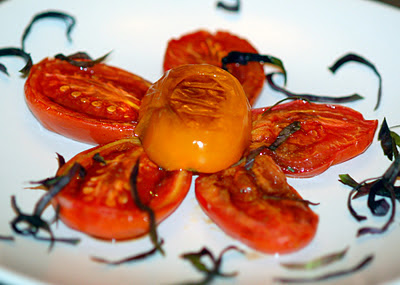
Roasted Romas

Lest we ever be accused of size-based tomato discrimination, let us be clear: we run an equal opportunity tomato roasting operation here. And yes, roasted cherry tomatoes are amazing. But let's not forget that tomatoes of all shapes and sizes deserve a chance to be roasted. And we are here for them. Oh yes. Right here.


For roma tomatoes, start the oven at 325°. Halve lengthwise, turn face up on a nonstick baking sheet, and drizzle with a little olive oil. Roast for 30 minutes, then sprinkle with salt and turn the oven down to 300°. Cook for another 15 minutes.

Remove from oven and drizzle each tomato with a little balsamic vinegar. Replace in oven, roast for five more minutes, and then serve garnished with basil chiffonade and freshly ground black pepper.

Friday, October 7, 2011

Roasted Tomato Salad with Basil and Balsamic Reduction

We're pretty sure, having tasted this, that anyone currently in possession of cherry tomatoes is morally obligated to roast them.


Seriously. A raw cherry tomato is delightful. Roasting makes it...I don't know how to put this. Profound. World-changing. I now strongly suspect that the key to world peace will ultimately be found inside the roasted cherry tomato. You say I'm exaggerating. I can see where you'd get that intuition. But I say, try these. Then tell me what you think.


Ingredients
1 basket cherry tomatoes
Olive oil
Kosher salt
2 tbsp balsamic vinegar
A few basil leaves, chopped or chiffonade
(or fino verde, separated into individual leaves)
Black pepper


Preheat oven to 300° F.

Halve the cherry tomatoes (crosswise if round, lengthwise if oblong). Toss gently in a bowl with a little extra virgin olive oil and a pinch or two of salt. Pour onto a nonstick baking sheet, spread into a single layer, and turn face up. Roast in the oven for 30-35 minutes.

Meanwhile, heat the balsamic vinegar in a small pan or pot over medium heat. When it begins to simmer, turn heat down to medium low, and simmer gently until the volume reduces by half. Remove from heat.

When the tomatoes are done, serve in a bowl, sprinkle with a little basil and black pepper, and top with a spoonful of balsamic reduction.


Serves 2, but you'll want more, so why not go ahead and double the recipe?

Tuesday, October 4, 2011

Beet Feats: The Saga Continues

Some of you may recall that beets hold a special place in our hearts. In particular, they occupy the part of our hearts that wrenches in anticipated agony whenever we think about them. I know, I know, we put on a brave face. We loudly declare that they've been officially rehabilitated. We almost bring ourselves to say something we didn't quite bring ourselves to say. We casually let slip that we've sprinkled them on a salad and that we have done so voluntarily.


We don't hate them. We just refuse to call them by name.

The thing is, though, these previous beet escapades have always involved leaving them raw. That was the secret to unbeeting their beetiness. The lack of heat was their kryptonite. Their -- and I apologize for using technical jargon here -- inherent ooginess was disarmed by our refusal to put them within ten feet of a stove or stove-like object.

And then suddenly, it occurred to me...we were a one-trick beet pony. If we couldn't conquer the cooked beet, then really, hadn't the cooked beet conquered us?


It's worth contemplating. As you do...and I am speaking directly to all you fellow beetophobes out there...as you contemplate the one-trickedness of the proverbial beet pony, and puzzle over what on earth a beet pony might be and exactly how little sleep I may or may not have been getting lately, preheat your oven. Take out some chard-like roots, and do this with them. Then, ever so casually, without even quite looking directly at the plate, take a bite. Chew. Twice, even. You might be surprised.

Ingredients
3 medium beets, peeled, halved lengthwise, and cut into chunks or wedges
Olive oil
1 clove garlic, sliced
1 tsp chopped fresh rosemary
Salt and freshly ground white pepper
2 cups coarsely chopped green frisee mustard (or sub baby arugula)
3 tbsp balsamic vinegar
1 oz. goat cheese

Preheat oven to 400° F.

Toss the beets with a generous glug of olive oil, and mix with the garlic, rosemary, salt, and white pepper. Pour into a nonstick baking pan (I used a loaf pan -- you want it to be 1-2 layers deep) and cover with aluminum foil.

Roast covered in the oven for 25 minutes, then uncover, stir, and roast for 35-40 minutes more, stirring every 15 minutes or so.

Meanwhile, heat the balsamic vinegar in a small pot over medium heat until it just starts to simmer. Turn the heat to low and simmer gently until the volume has reduced by half. Remove from heat and set aside.

Arrange the mustard greens in a bowl. Drizzle lightly with olive oil and just a little balsamic reduction. Top with the roasted beets, drizzle with the rest of the reduction, and sprinkle with goat cheese and a dusting of white pepper. Serve hot.

Serves 2, and pairs well with Eggplant and Tomato with Fried Basil and Quinoa (coming soon!) when you're in the mood for something delectable and vegetarian.

Friday, September 30, 2011

Orzotto with Ripe Tomatoes and Sweet Basil

Have I mentioned that the fall quarter started? The fall quarter started. Inevitably, this means we run completely out of groceries without noticing, and then act shocked when it happens, as though we vaguely remembered there being small and assiduous grocery gnomes who did this sort of thing for us last time. (There have never been grocery gnomes, just in case you were suddenly perking up, wondering where to get some. Maybe at Costco. I will check).


Anyway, a few nights ago, after a fruitless 8pm run to our beloved Co-op for some quick-and-easy dinner ingredients, which happened to all be completely sold out, we begrudgingly started rooting around in our cupboards and fridge and garden for something remotely palatable to cook. Except that this turned out to be wonderful -- an Italianish, risotto-esque dinner that cooks in a fraction of the time thanks to the orzo pasta substituting for rice. So next time you have perfectly ripe tomatoes and fresh basil, try throwing this together. You can use white orzo instead of whole wheat if the latter proves difficult to track down (we found ours at Market of Choice in Oregon, but surely there must be other places that carry it), and either way, the whole dish takes less than 20 minutes.


Ingredients
1 1/2 cups vegetable broth
1 cup dried whole wheat orzo pasta
1 small clove garlic, pressed
3 medium-sized ripe, fragrant tomatoes, cut into what I'm going to call hunks (1-inch pieces or so) and sprinkled with 2 pinches salt (let sit for up to 30 minutes to bring out flavor)
30 leaves fresh sweet and/or purple basil, chiffonade
1/2 cup grated Parmiggiano Reggiano
3 tbsp pine nuts, lightly toasted (heat in a pan over medium heat, shaking frequently, till lightly brown)


Bring the broth to a boil in a medium-sized pot and add the orzo. Turn the heat down to low, cover, and simmer for 8-10 minutes until just barely al dente. Add the garlic and cook for about 30 seconds more, then add the tomatoes and basil. Cook, stirring occasionally, until the tomatoes are warmed through. Turn off the heat, throw in the parmesan, stir to combine, and spoon into bowls. Sprinkle with pine nuts and garnish with a small sprig of basil.

Serves 2, and pairs very well with Cline's Ancient Vine Zin.

Tuesday, September 27, 2011

Roasted Kale with Parmesan

Let us say, hypothetically, that you have been eating a lot of roasted kale. And let's say that perhaps, despite the fact that deep down, you know you have an unholy and unshakeable addiction, you like to occasionally exclaim, just for appearance's sake, "Oh, I wish there was something different to do with this plain old kale!"*


Funny you should mention it, because here is something different to do with that plain old kale: Roast it, and then sprinkle it with a little parmesan cheese.

Seriously.

Ingredients
1 bunch green kale, cut crosswise into strips, rinsed very well, and dried in a salad spinner
Olive oil
About 1/4 cup parmesan cheese, grated with a microplane**
Kosher salt

Preheat oven to 400 degrees. Toss the kale with some olive oil (enough to lightly coat the leaves) and arrange on a baking sheet. Slide into the oven, roast for 10 minutes, then flip the pieces and roast for 5-10 minutes more until the leaves are crisp and the stems are soft. Sprinkle lightly with parmesan, and roast for another minute. Remove from the oven, sprinkle with a generous pinch of salt, and serve hot.

*Some people may in fact say this in a vain attempt to convince others not to eat their kale, because of its supposedly boring nature, therefore leaving more for some people to eat themselves. Some people have deep-seated, leafy obsessions where their moral compasses used to be. Just saying.

**Microplanes are awesome, but that wasn't the point of this footnote. Instead, I was planning to mention that when you grate cheese with a microplane, it ends up quite a bit fluffier and larger in volume than when you grate the same amount of cheese with a regular cheese grater, so adjust the amount accordingly. You don't want too much parmesan here -- just enough for a light dusting over the kale.